

Ludovico’s mini-flora
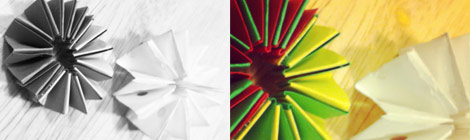
Ludovico loves magical paper experiments and today he taught us all how to make mini-flora. The original mini-flora prototype was made with white computer paper, while we tried new floral combinations with strips of coloured card.

The process is easy enough for young children to learn and make alone, or in this case with the help of the mini-flora master himself – Ludovico!
Here’s how to make them:
- Take two strips of paper of the same length and width (about 25x1cm is fine), although you may need a 40cm strip to make a full circle or ‘roller’. A bi-coloured mini-flora is quite stunning, so play with different colours.
- Next, glue the two strips together to make an L shape.
- Turn and fold, alternating between each leg of the L shape, so that eventually you have no L left, but a little ‘spring’. Glue the last fold onto the spring to help it stay in one piece.
- You can join different springs together to make circles, and what we call ‘mini-flora’. They can also be turned inside out.
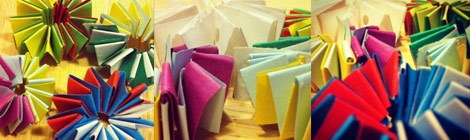
It’s a nice technique to experiment with, even though they serve no particular purpose! Mini-flora are fun to make and lovely to look at.
Thank you Ludo, from Viola, Francesca, Matteo, Viola and Rachel
